Blog
Attaching Headboard to Wall a Secure DIY Guide

For homeowners in Dyer and Crown Point looking to elevate their living space, mounting a headboard directly to the wall is a game-changer. It gives you that high-end, floating look and, more importantly, unmatched stability. This isn't just about aesthetics; it's a practical move that saves floor space and finally stops that annoying wobble that damages your paint and walls.
Why Wall Mounting Your Headboard Makes All the Difference
Here at Groen’s Fine Furniture, our family has been helping homeowners across Northwest Indiana create their perfect bedroom retreats since 1983. From Dyer to Schererville, we've seen one challenge pop up time and again: a beautiful headboard that just won't stay put. It wobbles, knocks, and scuffs up the wall behind it.
Securely attaching your headboard to the wall is more than just another DIY project. It’s a strategic design choice that elevates your entire space.
This simple change transforms a standard bed into a deliberate, built-in feature. It provides rock-solid stability, meaning no more disruptive sounds or movement when you shift in your sleep. For those of us with smaller bedrooms in places like Crown Point or Munster, this approach is a lifesaver. It can free up precious inches of floor space, making the whole room feel larger and more open.
Key Benefits of a Wall-Mounted Headboard
Wall mounting brings some serious practical advantages to the table, improving both the look and longevity of your bedroom. Our customers who make this switch always tell us how much they appreciate the immediate sense of permanence and quality it adds.
- Serious Stability: A wall-mounted headboard is fixed firmly in place. That means no more shifting, rattling, or knocking against the wall. This is especially important for heavier pieces, like the solid wood Amish headboards we're known for.
- Wall Protection: By stopping that constant friction and impact, you’re saving your paint and drywall from scuffs, dents, and long-term damage. The importance of this can't be overstated, and it's a core principle of properly securing furniture to the wall for overall home safety.
- Design Freedom: This method lets you use any bed frame you like—even a simple metal one—and still get a polished, cohesive look. You aren't limited by mismatched attachment points. For more ideas, you can check out our guide on designing a relaxing bedroom.
A Smart Investment in Your Home
Beyond the immediate visual appeal, wall-mounting is a smart move for your wallet. The global headboard market, which increasingly features wall-attached designs for stability, was estimated to hit $2.5 billion in 2025. One survey found that a whopping 72% of users who chose wall attachments reported less wall damage, saving an average of $300 in repairs.
Our family believes in lasting quality. Securing your headboard properly is a small step that protects your larger investment in a beautiful, comfortable bedroom for years to come.
Gathering Your Tools and Choosing the Right Hardware
Any good project starts with the right prep work. Before you jump into attaching your headboard to the wall, taking a few minutes to gather your tools and—most importantly—pick the right hardware will be the difference between a wobbly, frustrating setup and a rock-solid, professional one.
Think of it like cooking a good meal; you get all your ingredients out first. Our team at Groen's Fine Furniture has learned a thing or two since 1983, and we know that a little bit of prep saves a lot of headaches down the road.
Your Essential Tool Checklist
For most headboard installations in Northwest Indiana homes, whether it's a modern build in St. John or a historic house in Crown Point, a basic toolkit will do the trick. A few items, however, are absolutely non-negotiable for a secure fit.
- Measuring Tape: Accuracy is everything here. Before you even think about drilling, you need to know the exact dimensions of your headboard and where it will live on the wall. Our guide on how to measure furniture is a fantastic resource if you need a refresher.
- Pencil: Simple, but essential for marking your measurements and drill points.
- Stud Finder: This is your best friend when working with drywall. Anchoring directly into a wall stud gives you the strongest possible hold—something you definitely want for any significant weight.
- Level: A 24-inch or 48-inch level is perfect for making sure your headboard is perfectly straight. Trust us, a crooked headboard can throw off the balance of the entire room.
- Power Drill with Assorted Bits: You’ll need bits for drilling pilot holes and a driver bit for the screws. The type of bit is key: use a standard wood bit for studs, but switch to a masonry bit if you're tackling concrete or brick.
Choosing the Right Mounting Hardware
This is easily the most critical decision you'll make in this process. The hardware has to be a good match for both the weight of your headboard and the type of wall you have. A heavy, solid wood headboard needs a much beefier solution than a lightweight, upholstered one.
For our neighbors in Dyer, Munster, and the surrounding areas, this means being ready for anything from modern drywall to older, more finicky plaster walls. Let's break down the options you’ll find at the hardware store so you know exactly what to grab.
At Groen's, we believe in building things to last. The right hardware isn’t just about holding the headboard up; it’s about providing lasting stability and peace of mind for your family.
To make it even clearer, here’s a quick comparison of the most common mounting hardware. This should help you choose with confidence.
Headboard Mounting Hardware Comparison
| Hardware Type | Best For Wall Type | Weight Capacity | Installation Difficulty | Key Benefit |
|---|---|---|---|---|
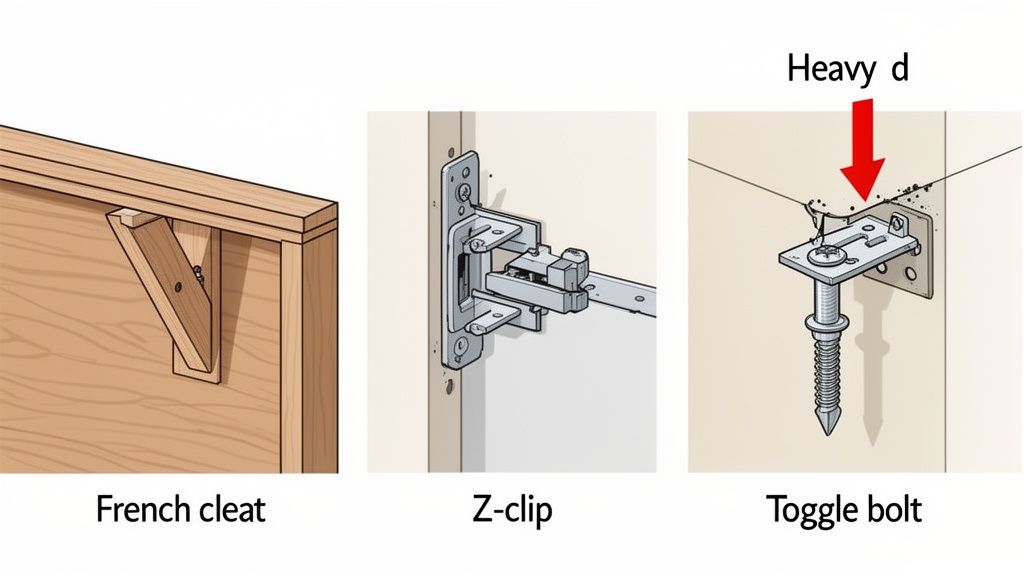
| French Cleats | Drywall (into studs), Plaster, Concrete | Very High | Moderate | Distributes weight evenly for an incredibly strong hold. Ideal for heavy, solid wood headboards. |
| Z-Clips | Drywall (into studs), Plaster | High | Moderate | Creates a completely flush, invisible mount. Perfect for sleek, modern designs. |
| D-Rings | Drywall (into studs) | Low to Medium | Easy | Simple and effective for lighter headboards. Similar to hanging a heavy picture frame. |
| Toggle/Molly Bolts | Drywall (no stud), Plaster | Medium | Moderate | Excellent for situations where you can't hit a stud but need more strength than a standard anchor. |
When it comes to heavier pieces, like a custom Amish headboard or a substantial Bassett design, our team almost always recommends a French cleat system. Its interlocking design is brilliantly simple but exceptionally strong.
Instead of concentrating all the weight on two or three small points, it distributes it across the entire length of the cleat. This makes it by far the safest and most secure option for furniture that's meant to last for generations.
A Practical Guide to Installation on Any Wall
With your tools in hand and hardware picked out, it’s time for the best part: getting that headboard up on the wall. This is where the real transformation happens, turning your bedroom into a space with a secure, stylish centerpiece. Our family at Groen’s Fine Furniture has walked countless homeowners through this process since 1983, and we want to share that same hands-on, practical knowledge with you.
This guide is built for the walls we see every day in Northwest Indiana homes—from the modern drywall in new St. John houses to the classic plaster in historic Crown Point gems. We'll go through each scenario with the kind of neighborly advice you’d expect from a local business that’s been part of the community for decades.
This simple visual breaks down the three core actions for a perfect installation.

Following the flow from measuring to leveling and finally drilling is the key to getting it right the first time.
Mounting on Drywall with Wood Studs
This is the most common wall type you'll find in modern homes and, thankfully, the most straightforward for mounting a headboard. The absolute non-negotiable for a secure fit is finding and using the wood studs inside your wall. Drywall alone is just too soft to hold any real weight.
Your first move is to grab an electronic stud finder and locate the studs behind your bed. When you find one, mark its center with a light pencil line. Don't just trust the first beep—scan back and forth a few times to be certain you've pinpointed the exact center.
Once the studs are marked, you can figure out where your mounting hardware will go. Whether you're using a French cleat system or simple D-rings, you need to make sure your screws will bite directly into the middle of those studs. A level is your best friend here. Use it to get your hardware perfectly horizontal before you even think about drilling pilot holes. This principle of precise measurement is critical for any wall project, and you can find more tips in our guide on hanging pictures with precision.
Navigating Plaster and Lath Walls
Older homes, like many you'll find around Dyer and the NWI area, often have plaster and lath walls. They have a certain charm, but they require a bit more finesse to work with. Plaster is much more brittle than drywall and can easily crack or crumble if you’re not careful.
You still need to find the studs, but stud finders can be notoriously finicky on plaster. A great old-school trick is to use a strong magnet to locate the nails that were used to fasten the wooden lath strips to the studs.
Our Family's Pro Tip: Before you drill into plaster, put a piece of painter's tape over your mark. This simple step does two things: it helps stop the plaster from chipping around the hole and gives your drill bit a little extra grip so it doesn't "walk" across your wall.
When you drill, start with a small pilot hole and use slow, steady pressure. If you feel the bit punch through the plaster and then hit solid wood, you've found a stud. If it just keeps going easily after the plaster, you’re in a hollow spot between studs. For a heavy headboard, hitting the studs is always the safest bet.
Tackling Concrete or Block Walls
If you live in a loft or have a masonry accent wall, your game plan changes completely. Concrete and block are incredibly strong, but you’ll need the right tools for the job. A standard drill is just going to spin its wheels and likely burn out.
A hammer drill is what you need here. This tool doesn't just spin; it also punches forward in a rapid hammering motion to power through masonry. You'll also need special masonry drill bits and concrete anchors (like sleeve anchors or lag shields) to securely fasten the mounting hardware to the wall.
Mark your drill points carefully, then use the hammer drill to create the holes for your anchors. Make sure to blow or vacuum the dust out of the holes before you insert the anchors—this ensures a tight, secure fit. It’s a bit more work and requires more specialized gear, but the result is an installation that’s rock-solid and can support even the most substantial headboards. For more great advice on fastening heavy items to different walls, this TV mounting survival guide is a fantastic resource.
No matter what kind of wall you're working with, always double-check your measurements and pull out that level one last time before you hang the headboard. It’s also a good idea to have a partner help you lift and set the headboard onto the hardware. A little patience here will pay off with a beautiful, stable result you can enjoy for years to come.
Advanced Solutions for Heavy or Unique Headboards
Sometimes, the headboard you fall in love with has a bit more presence. A heavy, solid wood Amish piece or a beautifully oversized upholstered Bassett headboard might need more support than standard D-rings can offer. When you’re dealing with significant weight or a unique shape, it’s time to bring in the professional-grade solutions.
Our family at Groen’s has seen it all since 1983, and we know that for these special pieces, you need hardware that offers uncompromising strength and peace of mind. These advanced methods ensure that even the most substantial headboards are secure, stable, and perfectly positioned.
The Gold Standard: The French Cleat System
For heavy or oversized headboards, our team’s number one recommendation is the French cleat system. This clever method uses two interlocking brackets, each cut at a 45-degree angle, to hang the headboard securely. One cleat gets mounted to the wall (firmly anchored into studs, of course), and the other is attached to the back of the headboard.
The real beauty of this system is how it distributes the headboard's weight. Instead of concentrating all that stress on a few small screws, it spreads the load across the entire length of the cleat, making it incredibly strong and stable.
It’s also surprisingly forgiving. If your wall cleat is just a hair off-level, you can often slide the headboard slightly left or right to get it perfect. This is the exact method we trust for the heirloom-quality solid wood bed frames and headboards we carry from our Amish craftsmen.
A French cleat provides a rock-solid foundation that honors the craftsmanship of a heavy headboard. It’s a solution built for furniture that’s meant to last a lifetime.
Achieving a Seamless Look with Z-Clips
For a completely invisible mount, Z-clips are a fantastic option. They work on a similar principle to a French cleat, but they are smaller, interlocking metal brackets. Instead of one long cleat, you’ll typically use several pairs spaced out along the back of the headboard and the wall.
This method is perfect for achieving that sleek, flush-mounted look where the headboard appears to float just off the wall with no visible hardware. They're strong, reliable, and a favorite for more modern or minimalist designs where clean lines are a top priority. Just like with cleats, making sure the wall-side clips are anchored into studs is non-negotiable for a secure installation.
When Studs Don't Cooperate: Heavy-Duty Anchors
So, what happens when your ideal headboard position falls smack in the middle of two studs? While we will always recommend hitting studs for heavy items, sometimes it’s just not possible. In these scenarios, you need something much, much stronger than a standard plastic drywall anchor.
This is where heavy-duty toggle bolts or molly bolts come into play. These are your best friends for hollow walls.
- Toggle Bolts: These feature spring-loaded "wings" that you fold to push through a pre-drilled hole. Once inside the wall cavity, the wings pop open and brace against the back of the drywall, providing a far superior hold.
- Molly Bolts: A molly bolt has a metal sleeve that expands and grips the back of the drywall as you tighten the screw, creating a very secure anchor point.
While these are great solutions, they are best reserved for medium-weight headboards. For a truly massive piece, a better strategy is to first mount a horizontal support board (like a 1×4) to the wall, screwing it securely into the studs. Then, you can attach your headboard directly to that sturdy board wherever you need.
Recent search trends show upholstered headboards are incredibly popular, with interest peaking at 63% in June. This directly influences the need for robust wall attachment methods, as these often heavier, softer designs may require the stability of a French cleat system. For more details on these market trends, you can read the full industry analysis.
Creating Your Dream Bedroom with Custom Solutions
While mounting a headboard yourself can be a really satisfying project, sometimes your vision for the perfect bedroom just can't be found in a box. Our family at Groen’s Fine Furniture has been helping our Northwest Indiana neighbors since 1983, and we've learned that true comfort and style often come from a custom touch. This is where you don't have to settle for "good enough"—you can create something truly special.
Sometimes, a project calls for more than just the right tools. It calls for a bespoke solution, designed just for your space and your style.
When to Choose a Custom Headboard
Plenty of situations call for a custom-ordered headboard instead of a standard one. If you're working with a unique architectural feature, like a slanted ceiling or a recessed nook, a standard headboard is never going to fit quite right. A custom piece can be built to the exact dimensions you need, turning what was an awkward space into a stunning, integrated feature.
Another common reason is simply getting that perfect design match. You might have existing bedroom furniture with a specific wood finish or stain that’s nearly impossible to find off the shelf. Our Custom Order Services are designed for exactly this kind of challenge.
- Heirloom-Quality Craftsmanship: We can work with our American-based Amish craftsmen to create a solid wood headboard that not only matches your existing pieces but is built to last for generations.
- Brand-Specific Styles: Maybe you love a particular look from brands like Flexsteel or Bassett. We can help you order a headboard in the exact fabric, finish, and style that completes your vision.
At Groen's, "custom" means you never have to compromise. Our family believes your furniture should be a perfect reflection of you, and we're here to help you design it your way.
The White-Glove Difference: Professional Installation
Choosing a beautiful custom headboard is the first step; making sure it’s installed flawlessly is the second. For our customers in Dyer, Crown Point, and the surrounding areas, our White-Glove Delivery and installation service offers complete peace of mind. You won't have to worry about finding studs, leveling heavy pieces, or even owning the right tools.
Our experienced team handles everything. We’ll deliver your new headboard, install it securely and perfectly, and ensure your space is clean and ready to enjoy. This service is a lifesaver for heavy, oversized, or complex headboards that really need expert handling. It’s the completely hassle-free way to guarantee a professional result, protecting both your new furniture and your walls.
For more inspiration on finishing your new look, our guide on accessorizing the bed of your dreams has some great ideas to pull everything together.
Making Your Dream Bedroom a Reality
Creating a personalized bedroom retreat shouldn't feel out of reach. We're committed to making quality and customization accessible for our community. Through our Special Financing options (subject to credit approval), we can help you get the buying power you need to invest in the made-to-order headboard you truly love, fitting it comfortably into your budget.
When a standard solution just won't do the trick, our family is ready to help you explore the world of custom furniture. Let us help you create a bedroom that is uniquely yours, down to the very last detail.
Common Questions About Wall Mounting Headboards
Since our family started helping our neighbors across Northwest Indiana furnish their homes back in 1983, we’ve heard just about every question you can imagine. Attaching a headboard to a wall is one of those projects that always brings up a few common concerns, and our team wants to give you clear, trustworthy answers so you can finish your project with complete confidence.
We’ve put together the most frequent questions we hear in our Dyer and Crown Point showrooms to give you the practical, neighborly advice you’re looking for.
How High Should I Mount My Headboard on the Wall?
Finding the perfect height is really a blend of function and personal style. A great rule of thumb is to set the bottom edge of the headboard about 2 to 4 inches below the top of your mattress. This positioning neatly hides any gap but still gives you plenty of clearance for pillows.
But here’s a tip from experience: visual balance is just as important. Before you even think about drilling, grab a partner and hold the headboard against the wall. Stack your pillows up, lean back, and see how it feels. This quick test is the best way to make sure it’s not only comfortable but looks proportional to your bed and the entire room.
Can I Mount a Headboard Without Finding Studs?
Technically, yes, but we need to be careful here. For a very lightweight, purely decorative headboard, you might get away with using heavy-duty drywall anchors like toggle bolts. They're designed to grip the back of the drywall and offer more strength than a simple screw.
However, for anything with real weight—especially the beautiful, solid wood Amish headboards we love—our family strongly advises against it. The only truly safe and secure method is anchoring directly into studs. If your studs don't line up quite right, don't worry. A fantastic solution is to first screw a horizontal support board (like a 1×4) into the studs, and then you can attach your headboard directly to that board, wherever you need to.
What Is the Best Method for a Heavy Upholstered Headboard?
For this job, a French cleat system is the undisputed champion. It’s the gold standard for any heavy or oversized headboard, whether it's solid wood or richly upholstered. The system uses two interlocking brackets that spread the weight evenly across a wide area, making it incredibly strong and stable.
You mount one bracket to the wall (screwed securely into the studs, of course) and the other to the back of the headboard. They then lock together perfectly. This approach not only delivers superior strength but also makes it surprisingly easy to lift the headboard off the wall if you ever need to. It’s the professional’s choice for a reason.
At Groen's, we believe in lasting quality. For a substantial piece from a brand like Bassett or Flexsteel, a French cleat provides the security and stability that honors its craftsmanship.
Will Attaching a Headboard Damage My Walls?
This is a worry we hear all the time, but the reality is actually the opposite. When you mount a headboard properly, you’re only creating a few small screw holes that are incredibly easy to patch up later.
In fact, mounting it often prevents more significant damage. Freestanding headboards are notorious for bumping and scraping against the wall day after day, leaving behind scuffs, dents, and chipped plaster. By securing the headboard, you completely eliminate that movement and protect your wall from daily wear and tear. When it’s time to move or redecorate, a little spackle and a dab of paint will make the wall look good as new.
Visit Groen’s Fine Furniture in Dyer or Crown Point today to explore our custom options and ask about our special financing plans. Let our family help you create a home you love. Learn more at groensfinefurniture.com.